Kubernetes setup locally using kubeadm
Hello reader, today i will show you in this article how i managed to install a Kubernetes cluster on my computer using kubeadm, this cluster contained two worker nodes with 2 GB of ram each alongside with one master node (2.5 GB of ram) so it was pretty heavy on my computer to be honest.
But first of all, let’s talk about kubernetes.
Kubernetes
So, kubernetes(we will call it k8s) is a container orchestration tool which allows you to run multiple containerized services and it let’s you to scale your application with ease.
What do we find inside a Kubernetes cluster?
We can represent a kubernetes cluster by the following diagram
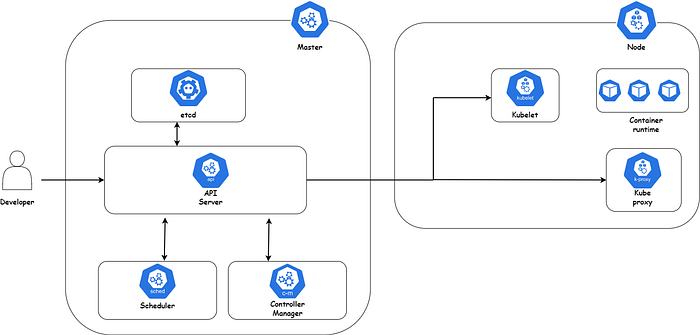
So, we are going to go through every component and explain its role:
- Master Node: The worker node(s) host the Pods that are the components of the application workload. The control plane manages the worker nodes and the Pods in the cluster.
- Kube-apiserver: The API server is a component of the Kubernetes control plane that exposes the Kubernetes API. The API server is the front end for the Kubernetes control plane.
- Etcd: Consistent and highly available key value store used as Kubernetes’ backing store for all cluster data.
- Kube-scheduler: Control plane component that watches for newly created Pods with no assigned node, and selects a node for them to run on.
- Kube-controller-manager: Control plane component that runs controller processes.Logically, each controller is a separate process, but to reduce complexity, they are all compiled into a single binary and run in a single process.
- Worker Node: Kubernetes runs your workload by placing containers into Pods to run on Nodes. A node may be a virtual or physical machine, depending on the cluster. Each node is managed by the control plane and contains the services necessary to run Pods.
- Kubelet: An agent that runs on each node in the cluster. It makes sure that containers are running in a Pod.
- Kube-proxy: kube-proxy is a network proxy that runs on each node in your cluster, implementing part of the Kubernetes Service concept.
- Container runtime: The container runtime is the software that is responsible for running containers. Kubernetes supports container runtimes such as containerd, CRI-O, and any other implementation of the Kubernetes CRI (Container Runtime Interface).
Kubernetes setup using kubeadm
Kubeadm
kubeadm helps you start a minimal, viable, and best-practice Kubernetes cluster. With kubeadm, your cluster must pass Kubernetes Conformance testing . Kubeadm also supports other lifecycle functions, such as upgrades, downgrades, and bootstrap token management .
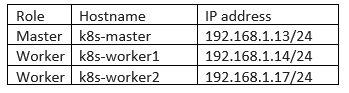 I managed to create these 3 virtual machines Ubuntu 18.04 on VMware with 2 vCPU each and i connected them via Bridged network.
Bridged network
Bridging is distinct from routing. Routing allows multiple networks to communicate independently and yet remain separate, whereas bridging connects two separate networks as if they were a single network.
So after creating the vms and connecting them , i installed openssh-server on every machine so the sshd could be enabled and i sshed to each one of them .
 Now we can start working .
Prepare the environments
The following Steps must be applied to each node (both master nodes and worker nodes).
Disable the Swap memory
The Kubernetes requires that you disable the swap memory in the host system because the kubernetes scheduler determines the best available node on which to deploy newly created pods. If memory swapping is allowed to occur on a host system, this can lead to performance and stability issues within Kubernetes .
You can disable the swap memory by deleting or commenting the swap entry in /etc/fstab manually or by running the following command
sudo swapoff -a
Configure or Disable the firewall
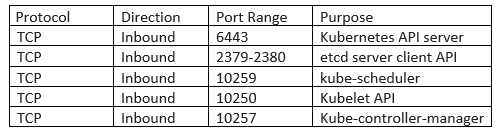
When running Kubernetes in an environment with strict network boundaries, such as on-premises datacenter with physical network firewalls or Virtual Networks in Public Cloud, it is useful to be aware of the ports and protocols used by Kubernetes components
The ports used by Master Node :
 The ports used by Worker Nodes :

You can either disable the firewall (not recommended) or allow the ports on each node.
Add firewall rules to allow the ports used by the kubernetes nodes
Allow the ports used by the master node :
mk@k8s-master:~$ sudo ufw allow 6443/tcp
[sudo] password for mk:
Rules updated
Rules updated (v6)
and we follow up with other ports .
Allow the ports used by the worker nodes :
mk@k8s-worker1:~$ sudo ufw allow 10250/tcp
[sudo] password for mk:
Rules updated
Rules updated (v6)
and we follow up with other ports .
Installing Docker Engine
Kubernetes requires you to install a container runtime to work correctly.There are many available options like containerd, CRI-O, Docker etc
By default, Kubernetes uses the Container Runtime Interface (CRI) to interface with your chosen container runtime.If you don’t specify a runtime, kubeadm automatically tries to detect an installed container runtime by scanning through a list of known endpoints.
You must install the Docker Engine on each node!
Set up the repository
sudo apt update
sudo apt install ca-certificates curl gnupg lsb-release
Add Docker’s official GPG key
sudo mkdir -p /etc/apt/keyrings
curl -fsSL https://download.docker.com/linux/ubuntu/gpg | sudo gpg - dearmor -o /etc/apt/keyrings/docker.gpg
Add the stable repository using the following command
echo \
> "deb \[arch=$(dpkg - print-architecture) signed-by=/etc/apt/keyrings/docker.gpg\] https://download.docker.com/linux/ubuntu \
> $(lsb\_release -cs) stable" | sudo tee /etc/apt/sources.list.d/docker.list > /dev/null
Install the docker engine
sudo apt-get update
sudo apt-get install docker-ce docker-ce-cli containerd.io docker-compose-plugin
Make sure that the docker will work on system startup
sudo systemctl enable - now docker
Configuring the Cgroup Driver
cat <<EOF | sudo tee /etc/docker/daemon.json
{
"exec-opts": \["native.cgroupdriver=systemd"\],
"log-driver": "json-file",
"log-opts": {
"max-size": "100m"
},
"storage-driver": "overlay2"
}
EOF
Restart the docker service to make sure the new configuration is applied
sudo systemctl daemon-reload && sudo systemctl restart docker
Installing kubeadm, kubelet and kubectl
Update the apt package index and install packages needed to use the Kubernetes apt repository
sudo apt-get update
sudo apt-get install -y apt-transport-https ca-certificates curl
Download the Google Cloud public signing key
sudo curl -fsSLo /usr/share/keyrings/kubernetes-archive-keyring.gpg https://packages.cloud.google.com/apt/doc/apt-key.gpg
Add the Kubernetes apt repository
echo "deb \[signed-by=/usr/share/keyrings/kubernetes-archive-keyring.gpg\] https://apt.kubernetes.io/ kubernetes-xenial main" | sudo tee /etc/apt/sources.list.d/kubernetes.list
Update apt package index, install kubelet, kubeadm and kubectl
sudo apt update && sudo apt install -y kubelet=1.23.1–00 kubectl=1.23.1–00 kubeadm=1.23.1–00
Initializing the control-plane node
At this point, we have 3 nodes with docker, kubeadm , kubelet , and kubectl installed. Now we must initialize the Kubernetes master, which will manage the whole cluster and the pods running within the cluster kubeadm init by specifiy the address of the master node and the ipv4 address pool of the pods .
sudo kubeadm init - apiserver-advertise-address=192.168.1.13 - pod-network-cidr=10.1.0.0/16
You should wait a few minutes until the initialization is completed. The first initialization will take a lot of time so be patient .
Configuring kubectl
As known, the kubectl is a command line tool for performing actions on your cluster. So we must to configure kubectl . Run the following command from your master node :
mkdir -p $HOME/.kube
sudo cp -i /etc/kubernetes/admin.conf $HOME/.kube/config
sudo chown $(id -u):$(id -g) $HOME/.kube/config
Installing Calico CNI
Calico provides network and network security solutions for containers. Calico is best known for its performance, flexibility and power. Usecases: Calico can be used within a lot of Kubernetes platforms (kops, Kubespray, docker enterprise, etc.) to block or allow traffic between pods, namespaces .
Install Tigera Calico operator
kubectl create -f "https://projectcalico.docs.tigera.io/manifests/tigera-operator.yaml"
The Tigera Operator is a Kubernetes operator which manages the lifecycle of a Calico or Calico Enterprise installation on Kubernetes. Its goal is to make installation, upgrades, and ongoing lifecycle management of Calico and Calico Enterprise as simple and reliable as possible.
Download the custom-resources.yaml manifest and change it . The Calico has a default pod’s CIDR value. But in our example, we set the — pod-netwokr-cidr=10.1.0.0/16 . So we must change the valueof pod network CIDR in custom-resources.yaml
wget "https://projectcalico.docs.tigera.io/manifests/custom-resources.yaml"
Now we edit this file before create the Calico pods
\# This section includes base Calico installation configuration.
\# For more information, see: https://projectcalico.docs.tigera.io/master/reference/installation/api#operator.tigera.io/v1.Installation
apiVersion: operator.tigera.io/v1
kind: Installation
metadata:
name: default
spec:
\# Configures Calico networking.
calicoNetwork:
\# Note: The ipPools section cannot be modified post-install.
ipPools:
\- blockSize: 26
cidr: 10.1.0.0/16
encapsulation: VXLANCrossSubnet
natOutgoing: Enabled
nodeSelector: all()
\- -
\# This section configures the Calico API server.
\# For more information, see: https://projectcalico.docs.tigera.io/master/reference/installation/api#operator.tigera.io/v1.APIServer
apiVersion: operator.tigera.io/v1
kind: APIServer
metadata:
name: default
spec: {}
After Editing the custom-resources.yaml file. Run the following command
kubectl create -f "custom-resources.yaml"
Before you can use the cluster, you must wait for the pods required by Calico to be downloaded. You must wait until you find all the pods running and ready!
kubectl get pods - all-namespaces
Joining nodes
To join the worker node to the master node , we need to run the following command
sudo kubeadm token create - print-join-command
Now we copy paste the command on the worker node
sudo kubeadm join 192.168.1.13:6443 - token ekbcke.gqabooulf01ht13t - discovery-token-ca-cert-hash sha256:fbcded8c93105c67720c5e3d6c372427280b2f3805d71e88729cfed48fb18abc
now we finally run
kubectl get nodes
and that’s what we get
I was lazy to launch the second worker :D, i hope you enjoyed reading this article .